


Quand utiliser le point de reliure dans les projets de tapisserie (et quand l'ignorer)
Pour tout passionné de broderie au point de croix, il est essentiel de savoir quand utiliser le point de reliure pour terminer un projet en beauté et en assurer la durabilité. Ce point essentiel est généralement utilisé pour finir les bords d'une toile de broderie au point de croix, offrant un aspect soigné tout en empêchant le tissu de s'effilocher. Cependant, tous les projets ne bénéficient pas de cette technique. Dans cet article, nous verrons quand utiliser le point de reliure et quand il est préférable d'opter pour d'autres techniques de finition.
Qu'est-ce que le point de reliure ?
Avant de nous plonger dans des projets spécifiques, examinons rapidement les bases. Le point de reliure est utilisé pour fixer les bords de votre toile de broderie, donnant au projet une finition professionnelle. Il est parfait pour ajouter une durabilité supplémentaire aux pièces qui subiront beaucoup d'usure, tout en donnant un aspect soigné et fini. Mais savoir quand l'appliquer - ou l'éviter - est tout aussi important que de maîtriser le point lui-même.
Comment réaliser un point de reliure parfait
Si vous n'êtes pas encore familier avec le point de reliure, sachez qu'il existe différentes manières d'exécuter ce point, mais nous vous conseillons d'apprendre la méthode qui crée un joli motif à chevrons sur le devant de votre ouvrage, lui donnant un aspect propre et professionnel. Nous pensons que cette technique crée le meilleur résultat final sur le point de reliure, c'est pourquoi nous avons réalisé une vidéo spéciale pour vous apprendre à la réaliser.
Consultez le tutoriel, dans lequel nous vous montrons comment obtenir le point de reliure parfait avec des instructions étape par étape .
Quand utiliser le point de reliure
Il existe plusieurs types de projets de broderie qui bénéficient d'un bord solide et poli. Que l'objet soit fonctionnel ou fréquemment manipulé, le point de reliure peut offrir à la fois une protection et une esthétique soignée. Voici quelques exemples où il est essentiel d'utiliser le point de reliure :
Les porte-clés sont l'un des articles de broderie les plus manipulés, ce qui signifie que leurs bords peuvent rapidement s'effilocher sans finition appropriée. L'utilisation du point de reliure sur les bords de votre porte-clés garantit qu'il reste intact et durable au fil du temps, même avec une utilisation constante. Il aide également à maintenir la forme de la toile, donnant à votre projet un aspect fini et professionnel.

Découvrez la meilleure façon de terminer ce projet grâce à notre tutoriel de finition de porte-clés au point de croix.
Les patchs sont souvent cousus sur des vêtements ou des sacs et subissent beaucoup de mouvements. Le point de reliure sécurise les bords, garantissant que votre patch ne s'effilochera pas avec l'usure. Sans cela, les bords d'un patch peuvent s'effilocher ou perdre leur forme, compromettant l'aspect général et la longévité du motif.

Apprenez la meilleure façon de terminer ce projet grâce à notre tutoriel de finition de patch au point de croix.
Les marque-pages étant régulièrement glissés dans les livres, leurs bords sont particulièrement vulnérables à l'effilochage. Le point de reliure permet non seulement de sécuriser les bords, mais également d'ajouter une finition soignée qui correspond aux détails méticuleux du motif de broderie lui-même. Il contribue à maintenir l'intégrité structurelle de votre marque-page.

Découvrez la meilleure façon de terminer ce projet grâce à notre tutoriel de finition de marque-pages au point de croix.
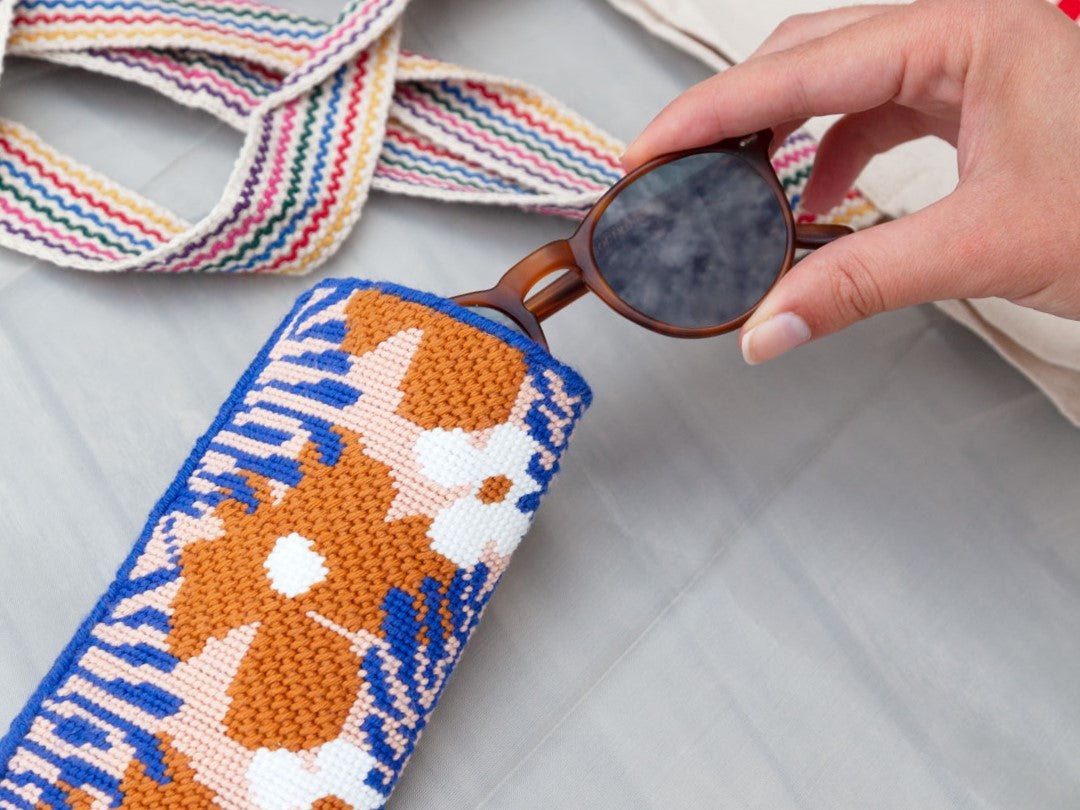
4. Étuis à lunettes de soleil Needlepoint
Tout comme les porte-clés, les étuis à lunettes de soleil sont souvent placés dans et hors des sacs, où les bords rugueux peuvent s'accrocher à d'autres objets ou s'effilocher. Le point de reliure confère à ce projet une durabilité supplémentaire, garantissant que les bords résistent au fil du temps et que l'étui conserve sa forme.

Apprenez la meilleure façon de terminer ce projet grâce à notre tutoriel de finition d'étui à lunettes de soleil au point de croix.
5. Inserts d'embrayage à point d'aiguille
Les inserts de pochette sont souvent manipulés, en particulier lors de leur insertion et de leur retrait des pochettes en acrylique, ce qui peut exercer une pression sur les bords de votre toile de broderie. L'ajout d'un point de reliure sur les bords de votre insert de pochette renforcera la pièce, l'aidant à résister à une utilisation régulière tout en conservant une finition impeccable.

Découvrez la meilleure façon de terminer ce projet grâce à notre tutoriel de finition d'insert d'embrayage à point de croix.
6. Ceintures à broderie
Les ceintures subissent une usure et des contraintes constantes, il est donc essentiel de sécuriser les bords. Le point de reliure garantit que les bords de la ceinture restent propres et intacts, empêchant l'effilochage et lui donnant un aspect fini et durable. Il garantit également que le tissu de la broderie résiste aux déformations et aux manipulations fréquentes.
7. Sangles de sac à main en broderie
Les sangles de sac à main sont soumises à une usure importante et l'utilisation d'un point de reliure est une manière intelligente de protéger les bords contre l'effilochage. Ce renfort supplémentaire prolonge non seulement la durée de vie de la sangle, mais ajoute également une touche finale professionnelle à votre projet.
Quand éviter le point de reliure
Bien que le point de reliure soit idéal pour les projets fonctionnels et fréquemment manipulés, il existe des moments où il ne constitue pas la meilleure option de finition. En fait, pour les projets purement décoratifs, ou ceux qui ne subissent pas beaucoup d'usure, le point de reliure peut nuire à la conception globale. Voici quand l'omettre :
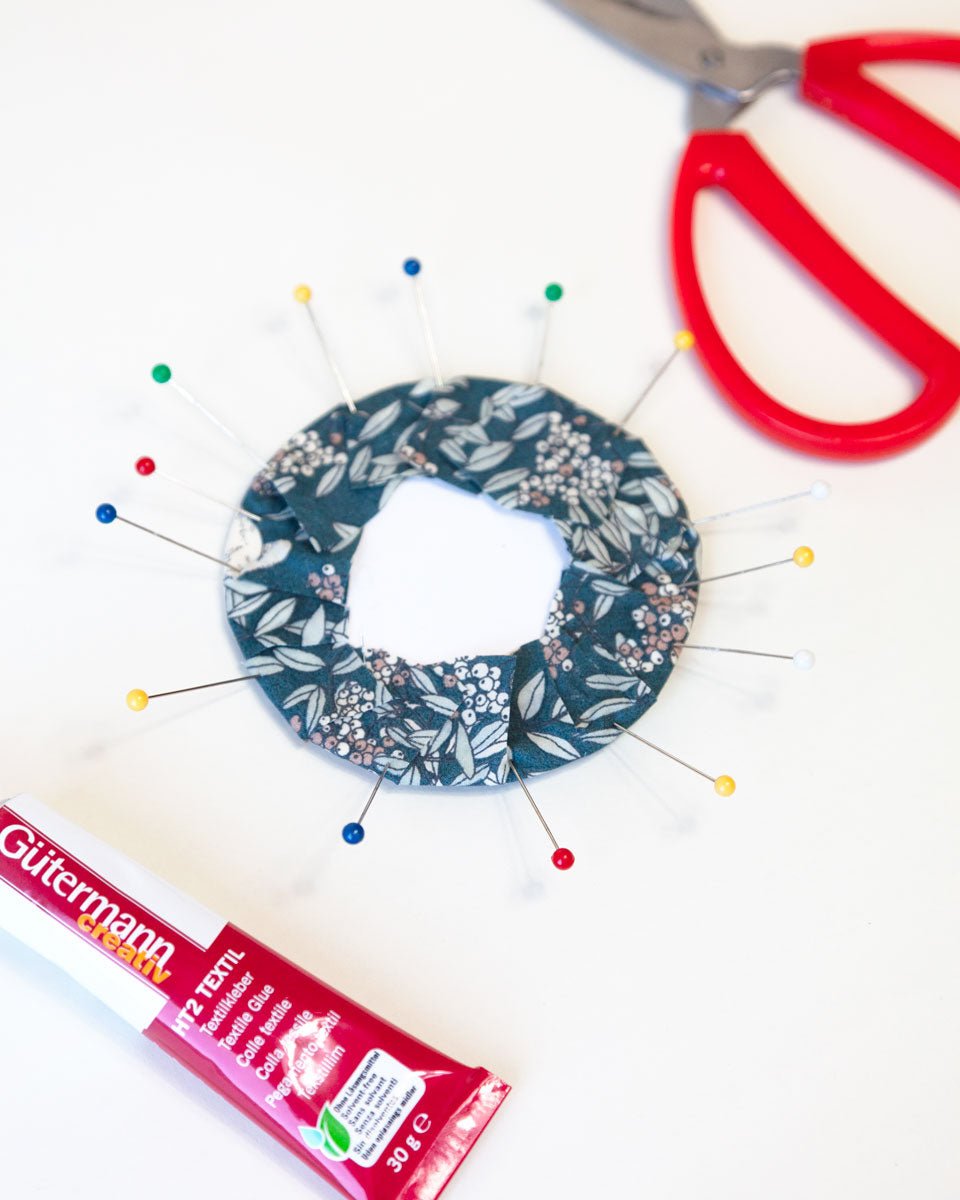
Récemment, lors de la finition d'une décoration au point de croix, nous avons essayé d'utiliser nous-mêmes le point de reliure, mais cela ne nous a pas donné les meilleurs résultats. Le point a tendance à ajouter du volume inutile aux bords, ce qui rend la finition moins soignée que prévu, également en raison de la rondeur du motif. Les cordons ou autres finitions décoratives, comme le ruban, fonctionnent beaucoup mieux pour donner aux décorations un bord élégant et sans couture. Le point de reliure ne produit tout simplement pas le même niveau de raffinement que d'autres techniques pour les décorations, nous pensons donc qu'il est préférable de laisser tomber ce projet.


Apprenez la meilleure façon de terminer ce projet grâce à notre tutoriel de finition de décoration au point de croix.
2. Bas brodés
Les bas sont généralement doublés ou finis avec du tissu ou d'autres embellissements, ce qui signifie que les bords de la toile brute sont cachés et protégés à l'intérieur de la doublure. De ce fait, il n'est pas nécessaire de faire un point de reliure. Concentrez-vous plutôt sur la doublure intérieure ou la finition des bords, qui garderont le projet durable et beau sans ajouter de volume inutile aux bords.

Apprenez la meilleure façon de terminer ce projet grâce à notre tutoriel de finition de bas au point de croix.
3. Coussins ou oreillers à broder
Pour les coussins ou oreillers brodés, une finition passepoilée est beaucoup plus adaptée que le point de reliure. Le passepoil donne aux bords un aspect doux et décoratif tout en renforçant la couture d'une manière qui complète la nature moelleuse d'un oreiller ou d'un coussin. Le point de reliure ne ferait qu'ajouter de la rigidité ou du volume, le rendant moins confortable et moins soigné dans l'ensemble.

Apprenez la meilleure façon de terminer ce projet grâce à notre tutoriel de finition de coussin au point de croix.
3. Broderie encadrée
Lorsque votre projet de broderie est destiné à être encadré, les bords sont cachés derrière le cadre, il n'est donc pas nécessaire de les relier. La toile est tendue et fixée à l'intérieur du cadre, ce qui la protège de l'effilochage. L'utilisation d'un point de reliure ajouterait du travail inutile sans aucun avantage visible, il est donc préférable de l'ignorer et de simplement monter et encadrer votre dessin.

Le dernier point à retenir
Le point de reliure est un outil polyvalent dans votre arsenal de broderie, offrant à la fois durabilité et aspect soigné pour de nombreux projets fonctionnels. Pour des articles tels que des ceintures, des porte-clés, des patchs, des marque-pages et des sangles de sac à main, c'est une technique incontournable qui permettra à votre travail de rester professionnel et durable. Cependant, pour des articles plus décoratifs ou à bords doux comme des ornements, des bas et des coussins, opter pour des alternatives comme le cordon, le passepoil ou simplement le laisser tel quel vous donnera une finition plus propre et plus élégante.
Comprendre quand utiliser le point de reliure – et quand ne pas le faire – garantit que chacune de vos créations au point de croix soit aussi belle que durable.
Besoin de plus de conseils pour terminer vos projets de broderie ? Consultez notre Guide de finition de broderie à faire soi-même , notre FAQ sur la finition ou n'hésitez pas à nous contacter si vous avez des doutes !
Bonne couture !


